A Robe Fit for the Queen

I've been out looking for a robe and gown for my hospital bag.  I found a few I liked but the price didn't fit into my gown & robe budget.  So, I decided to jump out there and make one for myself. 
I found a tutorial that seemed pretty easy on ToBeContinued: Ladies Kimono Robe- A Tutorial!

Thursday, hubby and I stopped by Hancock Fabric to get more fabric for slipcovers for the glider (post coming soon).  I found a value fabric for $4.95/yard that we both thought was pretty cute.  I bought 3 yards instead of 2.5 yards like the tutorial suggested.   I was nervous I would mess something up.
I did not follow all the steps of the tutorial but I used it for a guide.

Here's how I made my robe:
Easy DIY Robe
  1. Cut the fabric a length of 74".
  2. Fold the fabric in half length wise. Then, pin the edges.
  3. Find the center (the fold from the fabric being on bolt may still be there). Fold the fabric in half again. 
  4. Measure 11" from the folded edge. Then, measure 16" from the center. Using a washable marker, mark the measurements then make an upside down L by connecting the markings.
  5. With the fabric still folded, cut out the  upside down L.  
  6. Unfold the fabric.  Measure 3" from the center on both side and mark from the folded edge to the bottom of the fabric. Cut out the the rectangle with a curved edge on the fold.
  7. Hem (1/4") the edges of the sleeves (reverse stitch at the edges).
  8. With right sides together, pin the bottom of both sleeves and down both sides.  Then, sew them using a 1/2" seam (reverse stitch at the edges).
  9. Hem (1/4") the bottom edge.  
  10. Hem the inner edges and neckline (1/4").
  11. Cut the scrap piece from the center cut out in half.   
  12. With like sides together, sew the edges together.  Then, sew a 1/4" hem in the edges of the long piece.
  13. Fold the long piece in half with like sides together.  Sew the raw edge together.  
  14. Pull the fabric to the right side.  Sew the open edges together (reverse stitch).
  15. Iron both pieces.
It took about 1 hour to complete.

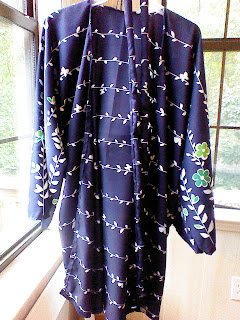
Check out my finished product.  I took this picture before I ironed. Not bad for my first attempt at sewing an article of clothing.

Comments

What's Hot Here?

NL 6519: I Knew It From the Start

Hey Loves! I'm back.  It's been a minute!  I've been busy! But, I took a quick break to make something for me. Top & Headband: By Me (New Look A6519; Cotton from Wal-Mart); Jeans: Target  (Similar); Shoes: JustFab  (Reeta) I saw the cutest yellow and black polka dot fabric in Wal-Mart on clearance (2 yards for $1.87).  When I saw it, I immediately thought about New Look A6519.  It's just one of those patterns I pick up often and put it back because the fabric isn't quite right.  Well, this was the one. I got home and printed one of the croquis from Golden Rippy .  I took a few minutes to sketch it out.  I enjoyed it so much! After sketching, I knew jeans would be perfect. Each time I try a new pattern, I have to read the directions thoroughly...usually 2 or 3 times before I start.  After reading the directions, I got to work.  The directions were so straight to the point and easy to follow.  I decided this pat...

Sew with Me: Old with the New

Hey Loves! This post is a week or two overdue, but it's better late than never.  About 2 weeks ago, I met up with the only people outside of my family who have truly known me all of my life.   They are like my sisters and brothers.   We grew up together. Loving and hating each other from preschool through high school.  It was so good to see them doing well.   Some brought their children.  Others brought their spouses or significant others.   We  laughed and reminisced about old times.  We talked about our family and plans for the future.   It was like we hadn't been apart,  some of us for 15 years. Now,  you know I had to whip something up for this grand occasion.   I went to my old faithful pattern McCall's 6754 .  I made view B.  I modified it by creating a small cutout on the back and only added the elastic to the area under the cutout.  I used a fun pin dot black ...

Let's Mix It Up

Hey Loves! It's been a while! A long time! Life has been so busy. I always enjoy the challenge of making myself something a little different for an event. As I made plans to attend the UNCF Birmingham Mayor's Masked Ball, I decided I'd make my dress. It's a combination of a new pattern and a tried and true pattern. I think it turned out well.  I visited JoAnna's for a little inspiration because I didn't have time to wait for items to ship and Simplicity patterns were $0.99. I saw Mimi G's Simplicity 9370. The cut out spoke to me. I decided that the right fabric could make it dressy enough for the event. I found this beautiful fabric in the athletic section in JoAnn. I walked past it 3 times and kept coming back, so I bought it. It was also 20% off.  I made a muslin of S9370 and decided I didn't like the neckline for a formal. So, with very limited time (3 days before the event), I decided to try to incorporate the cut ...